Sofa armrest repair techniques are practical methods to fix torn fabric, cracked leather, and collapsed padding on the most-used part of any couch. The industry term for this work is upholstery repair, and knowing the right approach for your material saves you hundreds of dollars over calling a professional. This guide covers every major method, from no-sew fabric patches to leather filler systems and foam replacement, so you can match the fix to the damage and get it done right the first time.
1. diagnose the damage before you touch anything
The right repair starts with an honest look at what is actually broken. Armrest repair depends on whether the damage is surface-only or has reached the foam and inner structure. Press the armrest firmly. If it sinks unevenly or feels hollow, the foam is compromised and a surface patch alone will fail within weeks.
Check the cover material next. Fabric, leather, and vinyl each require different adhesives, fillers, and tools. Misidentifying vinyl as leather is one of the most common DIY mistakes, and it leads to filler that cracks or dye that does not bond. Scratch a hidden corner lightly with your fingernail. Leather shows a slight grain impression; vinyl stays smooth.
2. fabric armrest patching with no-sew kits
No-sew patch kits are the fastest fix for torn or worn fabric armrests. Products like Tear Mender, Dritz Iron-On Mending Fabric, and FabricMend adhesive tape work on most woven upholstery without a single stitch. The key is preparation: clean the area with a lint roller and a damp cloth, then let it dry completely before applying anything.
Patches should extend beyond the damage on all sides, have rounded corners, and align with the fabric grain to avoid puckering. Rounded corners prevent the edges from lifting under daily friction. Straight-cut corners peel first.
Pro Tip: Keep the fabric cover relaxed and flat when you press the patch down. Stretching the fabric before bonding causes the patch to pucker or pull away once the cover returns to its natural position.
- Cut the patch at least 1 inch beyond the tear on every side
- Round all four corners with scissors before applying
- Align the patch grain with the surrounding fabric
- Press firmly for 60 seconds using a flat, hard surface underneath
3. cross-patching for high-stress armrest zones
Standard single patches often fail on armrests because of the constant tugging and flexing. Cross-patching spreads tension by adding a second shorter strip perpendicular to the first, forming a T or cross shape directly over the repair. This distributes the load across two directions instead of one.
This technique is especially effective on the front edge of armrests, where fabric takes the most stress from people sitting on the arm or leaning against it. Waterproof repair tape with a strong adhesive backing, such as Gorilla Tape Fabric Patch or Bondex Iron-On, holds better here than standard fabric tape. Prioritize hold strength over invisibility in these zones. A repair that lasts two years beats a pretty one that fails in two months.
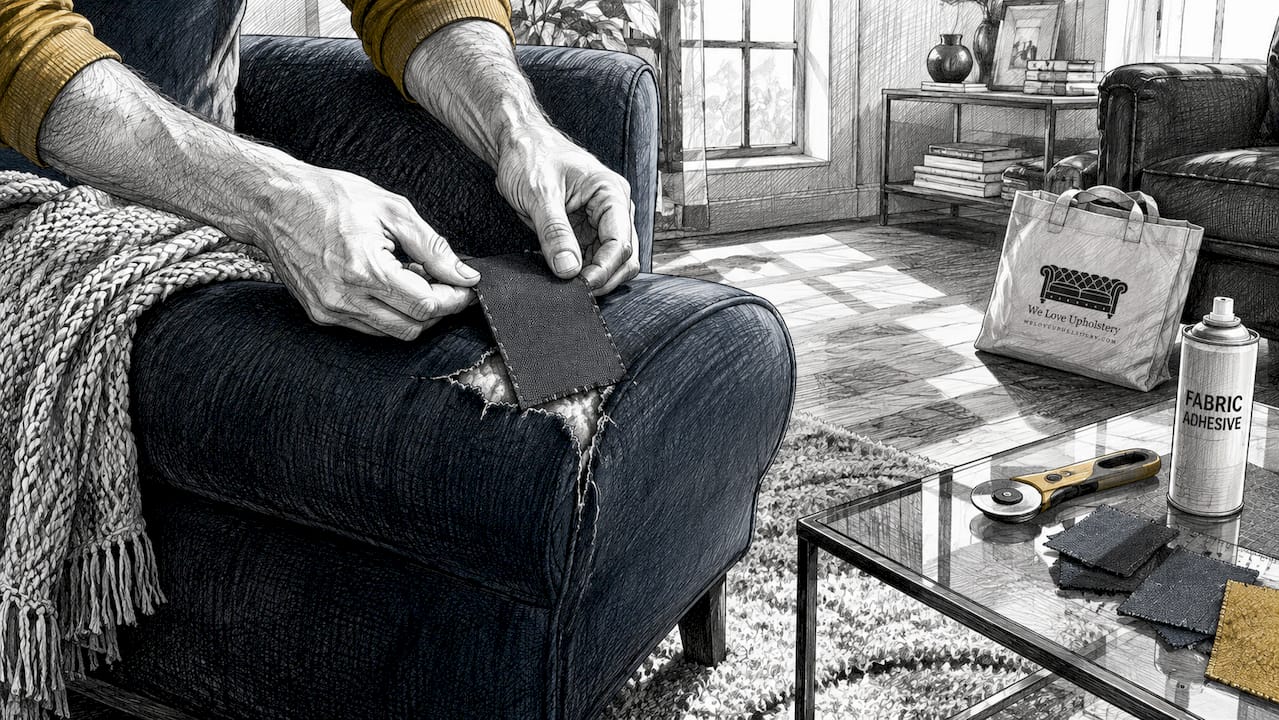
4. how to repair a leather or vinyl couch armrest
Repairing a leather couch armrest follows a three-step process: clean, sub-patch, and fill. Use rubbing alcohol or a leather-specific cleaner to remove all oils and dust before touching the repair area. Skipping this step is the single most common reason leather repairs fail within weeks.
- Clean the surface with rubbing alcohol on a lint-free cloth. Let it dry for 15 minutes.
- Cut a sub-patch from a leather repair backing sheet, sized to extend about 1 cm beyond the tear on all sides. Slide it under the tear and bond it with flexible leather adhesive.
- Apply filler in thin coats, letting each layer dry before adding the next. Sand lightly between coats with 400-grit sandpaper.
- Color-match and seal using a leather dye or colorant from kits like Leather Hero, Rub n Restore, or Furniture Clinic. Finish with a leather conditioner.
Pro Tip: Never use super glue or duct tape on a leather armrest. Super glue dries rigid and cracks the surrounding leather within days. Duct tape pulls the surface finish off when removed, making the repair area larger than the original damage.
Thick filler layers crack and undermine the repair. Thin, staged coats build a flexible surface that moves with the leather instead of fighting it.
5. armrest padding restoration and foam replacement
Flat or misshapen armrests need new foam, not just a cover fix. Measure foam inserts precisely and add 0.5–0.75 inches per side for a snug fit. Foam that is cut too small shifts inside the cover and creates lumps within weeks.
- Use a 1.8–2.0 lb density foam for armrests. Seat cushions need higher density, but armrests compress less and medium-density foam holds its shape well.
- Cut foam with an electric carving knife for clean, straight edges. Box cutters compress the foam and leave ragged cuts that affect the final shape.
- Wrap the foam in a layer of Dacron batting (polyester fiber wrap) before covering. This adds a soft, upholstered feel and hides any minor cutting imperfections.
- Secure foam to the armrest base with spray adhesive like 3M Super 77 before recovering. This prevents the insert from shifting when the cover is pulled tight.
Pro Tip: If you cannot access the armrest frame to replace foam, cut a slit in the bottom seam of the cover, remove the old foam, insert the new piece, and hand-stitch the seam closed using a curved upholstery needle and waxed thread.
For guidance on upholstery seam repairs after foam replacement, Weloveupholstery has a dedicated step-by-step tutorial.
6. reinforcing repairs to prevent future damage
A repair that does not address the cause of the original damage will fail again. Backing patches applied inside the fabric cover, behind the visible repair, extend the life of the fix by spreading tension across a wider area. This is the difference between a cosmetic patch and a structural repair.
“Armrest longevity is a mechanical issue. Cosmetic repairs alone fail without backing support or tension distribution.” This principle applies to every material, from canvas upholstery to bonded leather.
Additional reinforcement strategies that work:
- Add armrest guards or slip-on covers in high-traffic areas, especially in homes with pets or children. Products like Gorilla Grip Armrest Covers add a protective layer without altering the repair.
- Manage fabric grain direction when applying any patch. Patches placed against the grain create stress points that accelerate tearing.
- Clean repaired areas weekly with a dry cloth to prevent dirt buildup, which degrades adhesive bonds over time.
- Condition leather repairs monthly with a product like Leather Honey or Chamberlain’s Leather Milk to keep the filler layer flexible.
7. how long to wait before using a repaired armrest
Curing time is the most skipped step in DIY armrest repair. Allow at least 24 hours for adhesives and fillers to fully set before putting weight or pressure on the repair. Armrests are high-stress zones, and using them too soon pulls the repair apart before the bond reaches full strength.
For foam replacements secured with spray adhesive, 24 hours is the minimum. For leather filler repairs with multiple coats, 48 hours produces a noticeably stronger result. Mark the armrest with a piece of tape as a reminder. It is a small inconvenience that prevents redoing the entire repair.
8. comparing repair methods by material and damage level
The right fix depends on both the material and the severity of the damage. Use this table to match your situation to the best approach.
| Material | Damage Level | Best Method | Durability |
|---|---|---|---|
| Fabric | Small tear or hole | No-sew patch kit with cross reinforcement | 1–3 years with maintenance |
| Fabric | Worn through to foam | Patch plus foam replacement | 3–5 years |
| Leather or vinyl | Surface scratch or crack | Leather filler kit, thin coats, conditioner | 2–4 years |
| Leather or vinyl | Full rip or split | Sub-patch, flexible adhesive, filler, dye | 3–5 years |
| Foam or padding | Flat or misshapen | Foam replacement with Dacron wrap | 5+ years |
DIY repairs are the right call for surface damage, small tears, and foam replacement on accessible armrests. Professional upholstery work makes sense when the armrest frame is cracked, the cover requires full removal and reattachment, or the damage covers more than one-third of the armrest surface. For reupholstery techniques on more complex repairs, Weloveupholstery covers the full process in detail.
Key takeaways
Effective sofa armrest repair requires matching the method to the material and damage depth, then allowing full curing time before use.
| Point | Details |
|---|---|
| Diagnose before repairing | Determine if damage is surface-only or structural before choosing any repair method. |
| Cross-patch high-stress zones | Add a perpendicular strip over fabric repairs to distribute tension and prevent reopening. |
| Use thin filler coats on leather | Apply leather filler in multiple thin layers, sanding between coats, to prevent cracking. |
| Oversize foam by 0.5–0.75 inches | Cut replacement foam slightly larger than the cavity for a snug, long-lasting fit. |
| Always allow 24-hour cure time | Let adhesives and fillers set fully before using the armrest to avoid premature failure. |
What i have learned from repairing dozens of armrests
The repair that fails fastest is always the one where someone skipped the prep. I have seen leather repairs done with quality kits fall apart in two weeks because the surface was not cleaned with alcohol first. The filler bonds to the oil and dust, not the leather itself. That is not a product failure. That is a process failure.
The second thing I keep seeing is people applying one thick coat of leather filler and calling it done. It looks fine for a day. Then it cracks. Thin coats feel tedious, but they create a flexible layer that actually moves with the leather. Thick coats dry rigid and split under the first real flex.
For fabric repairs, the backing patch is the step most DIYers skip because it requires opening a seam or working from the inside. Do it anyway. A patch applied only to the outside of a high-stress armrest is fighting physics every time someone leans on it. The backing patch changes the mechanical equation entirely.
My honest advice: buy a complete leather repair kit like Furniture Clinic or a fabric repair kit like Dritz rather than piecing together individual products. The color-matching compounds, flexible adhesives, and conditioners in those kits are formulated to work together. Mixing random products from different brands creates compatibility problems that are hard to diagnose after the fact.
Most armrest repairs are genuinely achievable with basic tools and patience. The technique matters more than the budget.
— Dustin
Restore your armrests with the right resources

Weloveupholstery has built a library of practical repair guides written by people who have actually done this work. Whether you are patching a fabric armrest for the first time or tackling a full leather restoration, the DIY repair guides on the site walk you through each step with clear instructions and real examples. For material selection, the upholstery fabric guide helps you identify the right fabric weight and weave for recovering armrests that take daily abuse. If you need to stock up on adhesives, foam, batting, or repair kits, the materials and supplies archive lists trusted products for every repair type. Start with the right information and the right materials, and your armrest repair will last.
FAQ
What is the best way to repair a torn fabric sofa armrest?
Use a no-sew patch kit with rounded corners, aligned to the fabric grain, extending at least 1 inch beyond the tear. Add a cross-reinforcement strip for high-stress areas to prevent the repair from reopening.
Can i repair a leather couch armrest myself?
Yes. Clean the surface with rubbing alcohol, slide a flexible sub-patch under the tear, and apply leather filler in thin coats. Allow at least 24 hours of curing time before use.
How do i fix a flat or sagging sofa armrest?
Replace the foam insert, cutting it 0.5–0.75 inches larger than the cavity for a snug fit. Wrap the foam in Dacron batting before recovering to restore a full, upholstered shape.
How long do DIY sofa armrest repairs last?
Fabric patch repairs last 1–3 years with regular maintenance. Leather filler repairs last 2–4 years when properly conditioned. Foam replacements typically last 5 or more years.
When should i call a professional instead of doing it myself?
Call a professional when the armrest frame is cracked, the damage covers more than one-third of the surface, or the cover requires complete removal and reattachment with stapling or tacking.