Furniture epoxy repair is the process of using a two-part resin and hardener system to fill, bond, and reinforce cracks, gaps, and damaged areas in wood furniture. The result is a waterproof, rock-solid restoration that outlasts the original joint. Unlike wood filler or standard PVA glue, epoxy creates bond shear strengths of 80–90% of the original wood, with compressive strength that can exceed 10,000 psi. That beats oak’s approximate 6,000 psi. Brands like West System and TotalBoat have made professional-grade epoxy accessible to homeowners who want real, lasting repairs without calling a contractor.
What is furniture epoxy repair and why does it work?
Epoxy resin furniture repair works because of chemistry. When you mix the resin with the hardener, a chemical reaction creates a rigid, cross-linked polymer that bonds tightly to wood fibers. The result is stronger than most wood glues and completely waterproof once cured.
Traditional wood glue, specifically PVA glue, relies on the two surfaces being in close, tight contact. That works fine for clean edge-to-edge joins. The problem is that PVA glue fails on gaps wider than 1/16 inch. Furniture damage rarely comes in neat, tight cracks. You get voids, rot, and missing chunks. Epoxy fills all of it.

The industry term for this process is “structural epoxy consolidation,” and it covers everything from filling a cracked chair leg to stabilizing a rotted table base. The DIY community often shortens this to “furniture epoxy repair,” and both terms describe the same method. Knowing the technical name helps when you are reading product instructions or shopping for materials.
Why is epoxy better than traditional wood glue?
The numbers tell the story clearly. 70% of structural wood repairs now use epoxy, compared to just 40% a decade ago. That shift happened because homeowners and professionals both discovered that epoxy solves problems wood glue simply cannot.
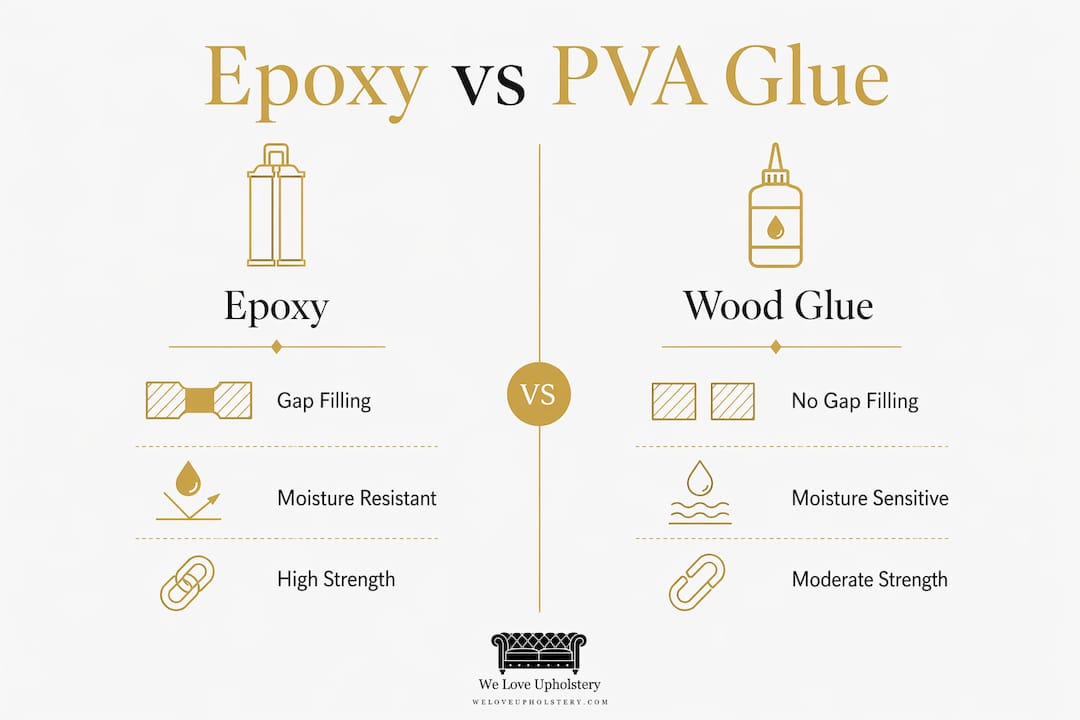
Here is a direct comparison of the two options:
| Feature | Epoxy | PVA Wood Glue |
|---|---|---|
| Gap-filling ability | Fills voids of any size | Fails on gaps wider than 1/16 inch |
| Bond strength | 80–90% of original wood strength | Adequate for tight, clean joints only |
| Water resistance | Fully waterproof when cured | Water-soluble; weakens with moisture |
| Flexibility | Rigid, structural repair | Slightly flexible, not structural |
| Best use case | Rot, cracks, voids, loose joints | Edge gluing, veneer, tight joints |
Epoxy also handles moisture-damaged wood that PVA cannot touch. A rotted table leg, for example, has soft, crumbling fibers that PVA cannot bond to. Low-viscosity epoxy soaks into those fibers and hardens them from the inside out. That is a repair PVA is physically incapable of making.
The cost comparison also favors epoxy for major repairs. A quality two-part epoxy kit like West System runs $40–$60 per quart. Replacing a major furniture component or a sheet of plywood can exceed $200. For most homeowners, the math is obvious.
What types of epoxy work best for furniture repair?
Not all epoxy products are the same, and choosing the wrong one is one of the most common mistakes DIYers make. The key variable is viscosity, which is how thick or thin the epoxy flows.
- Low-viscosity epoxy (under 500 cps): This flows like water and penetrates deep into wood grain. Use it to stabilize rotted or damaged wood before filling. West System 105 Resin is a well-known example.
- High-viscosity or thickened epoxy (over 5,000 cps): This is the filler. It stays where you put it and builds up missing material. Products like TotalBoat Thixo or West System with 407 Low-Density Filler are designed for this.
- Clear epoxy: Best when you want to preserve the wood’s natural color or apply a stain afterward. System Three Clear Coat is a popular choice for furniture restoration.
- Pigmented or tinted epoxy: Useful when you need the repair to blend visually without painting over it. Some kits include tinting agents.
For most furniture repair with epoxy, you will use both a low-viscosity and a high-viscosity product in sequence. The thin epoxy goes in first to consolidate the wood, then the thick filler builds the shape back up.
Pro Tip: Warm your resin bottle in a bowl of warm water (around 80°F) before mixing. This improves flow into tight cracks and speeds up the curing reaction, especially in a cool workshop.
How to prepare and apply epoxy for furniture repair
Getting the prep right is not optional. Expert Fix-it Frank states that surface preparation accounts for up to 80% of repair success. Skip it, and even the best epoxy will fail.
Follow these steps for a durable result:
- Remove all loose and rotted material. Use a chisel, wire brush, or pick to clear out any soft, crumbling wood. Epoxy bonds to solid wood, not to debris.
- Degrease the surface with acetone. Wipe down the repair area thoroughly. Oils, wax, and old finish all prevent adhesion. Let the acetone dry completely before moving on.
- Mix your epoxy at the correct ratio. Most two-part systems use a 1:1 or 2:1 ratio by volume. Read the label and follow it exactly. Eyeballing the ratio is how repairs fail.
- Apply the thin epoxy first. Flood the damaged area with low-viscosity epoxy and let it soak in. This consolidates the wood fibers and creates a solid base for the filler.
- Apply thickened epoxy filler. Once the first coat is tacky but not fully cured (usually 2–4 hours), apply your high-viscosity filler. Shape it slightly proud of the surface so you have material to sand back.
- Control your temperature. The optimal curing temperature is 70°F to 80°F. Below 60°F, epoxy cures slowly and may stay soft. Above 90°F, it can cure too fast and crack.
- Allow full cure before sanding or finishing. Full cure takes up to 7 days for maximum hardness. Sanding too early creates soft spots and ruins your finish.
Pro Tip: Apply a thin release film of paste wax to any clamps or tools that might contact the epoxy. Cured epoxy bonds permanently to metal and plastic, and removing it is a frustrating job.
Once cured, sand the repair starting at 80-grit and working up to 220-grit. Epoxy accepts stain unevenly because it does not absorb like wood. Use a gel stain or tinted epoxy to get a closer color match on visible repairs.
What mistakes should you avoid with epoxy furniture restoration?
Most failed epoxy repairs come down to a short list of avoidable errors. Knowing them before you start saves you from stripping everything back and starting over.
- Skipping surface prep. This is the number one cause of bond failure. Any contamination, loose material, or old finish between the epoxy and the wood creates a weak layer that will eventually let go.
- Using the wrong viscosity. Applying thick filler to rotted wood without a thin primer coat first means the filler sits on top of soft fibers instead of bonding to solid wood. The repair looks fine until you put weight on it.
- Getting the mixing ratio wrong. Incorrect mixing ratios cause exothermic cracking, where the heat generated by the chemical reaction cracks the epoxy as it cures. This ruins the repair completely and requires full removal before you can try again. Ahmed Hamade, a noted epoxy practitioner, specifically warns beginners about this failure mode.
- Working in the wrong temperature. Cold workshops are a silent killer for epoxy repairs. The resin thickens, flows poorly, and may never fully cure. Always check the manufacturer’s temperature range before you start.
- Rushing the cure. Finishing, sanding, or loading a repaired piece before full cure creates soft spots. A repair that feels hard after 24 hours may still be only 60% cured internally. Give it the full time the product specifies.
Understanding these failure points also helps you read a repair that someone else attempted. If you see a cracked or delaminated epoxy fill on a piece you bought secondhand, the cause is almost always one of the five issues above.
Key takeaways
Furniture epoxy repair succeeds when you match the right product to the damage, prepare the surface completely, and give the repair enough time to fully cure.
| Point | Details |
|---|---|
| Epoxy outperforms wood glue | Epoxy fills gaps of any size and achieves 80–90% of original wood strength. |
| Viscosity determines the job | Use low-viscosity epoxy to consolidate rot, then high-viscosity filler to rebuild shape. |
| Surface prep drives success | Degreasing and removing loose material accounts for up to 80% of repair success. |
| Temperature and ratio matter | Mix at the correct ratio and work between 70°F and 80°F to prevent exothermic cracking. |
| Full cure takes up to 7 days | Sanding or finishing before full cure creates soft spots and ruins the final result. |
The part most DIY guides get wrong about epoxy
I have watched a lot of homeowners approach epoxy repair the same way they approach wood filler: squeeze it in, sand it flat, call it done. That mindset produces repairs that fail within a year.
The real skill in furniture repair with epoxy is not in the application. It is in the diagnosis. Before you open a single tube, you need to understand what caused the damage. A crack from seasonal wood movement needs a different approach than a crack from impact. Rotted wood needs consolidation before filling. A loose joint needs the old glue removed before epoxy goes anywhere near it.
The two-stage method, thin epoxy first then thickened filler, is not just a technique. It is a philosophy. You are treating the wood, not just covering the problem. That distinction separates repairs that last decades from repairs that look good for six months.
My honest advice: practice on scrap wood before you touch a piece you care about. Mix a batch, apply it, let it cure, then sand it. You will learn more from that one practice run than from reading ten guides. Epoxy is forgiving in many ways, but it does not forgive impatience or skipped steps.
There are also limits. If a piece has structural damage across multiple joints, or if the wood is so far gone that there is nothing solid left to bond to, epoxy is not the answer. Knowing when to call a professional is part of being a skilled DIYer. Check out Weloveupholstery’s guide on furniture repair value to help you decide when repair makes sense versus replacement.
— Dustin
Start your next repair with the right resources
Epoxy repair is one of the most satisfying DIY skills you can develop. A cracked chair leg, a rotted table base, or a split drawer front can all come back to life with the right materials and method.

Weloveupholstery has a full library of step-by-step tutorials written specifically for homeowners tackling wood and upholstery repairs. Whether you are choosing between epoxy products or figuring out how to finish a repair so it blends with the original wood, the DIY repair guides cover every stage of the process. You can also browse the materials and supplies section for product recommendations and repair kits that match your specific project. No guesswork, just clear guidance from people who have done it.
FAQ
What is furniture epoxy repair in simple terms?
Furniture epoxy repair is the process of mixing a two-part resin and hardener to fill, bond, and reinforce damaged wood. It creates a waterproof, structural repair stronger than most wood glues.
Can i use epoxy on rotted wood furniture?
Yes. Low-viscosity epoxy penetrates soft, rotted wood fibers and hardens them from the inside. You then apply a thickened epoxy filler to rebuild the shape and surface.
How long does epoxy take to cure on furniture?
Epoxy typically feels hard within 24 hours but requires up to 7 days for full structural cure. Sanding or finishing before full cure creates soft spots that compromise the repair.
What is the best epoxy for furniture repair?
West System and TotalBoat are two of the most trusted brands for furniture repair with epoxy. West System 105 Resin works well for consolidation, while TotalBoat Thixo is a reliable choice for filling voids and rebuilding shape.
Does epoxy work on all types of wood furniture?
Epoxy bonds to hardwoods, softwoods, and most engineered wood products. The key requirement is that the surface must be clean, dry, and free of oils or old finish before application.