A cigarette falls, a candle tips over, or someone sets down a hot mug in the wrong spot. Suddenly you have a burn mark on your sofa and the sinking feeling that you need to replace the whole thing. You don’t. Sofa burn repair methods explained properly reveal that most burns, whether shallow scorch marks or clean holes, are fixable at home with the right approach. The three core techniques, patching, liquid filler, and hand sewing, each address different damage types and fabric combinations. This guide walks you through all of them so you can choose what fits your situation and get your couch looking like itself again.
Table of Contents
- Key Takeaways
- Sofa burn repair methods explained: start with prep
- The iron-on patch method for burn holes
- Applying liquid filler for a smooth, blended finish
- Hand sewing to close burn holes on fabric sofas
- Choosing the right method for your fabric and damage
- My honest take on DIY sofa burn repairs
- Ready to take the next step with your repair?
- FAQ
Key Takeaways
| Point | Details |
|---|---|
| Prep before everything | Clean the burn area and trim frayed edges before attempting any repair method. |
| Patching works fast | Iron-on patches with heat-activated adhesive are the quickest fix for moderate fabric burns. |
| Filler needs patience | Apply liquid filler in multiple thin layers, allowing each to cure fully before adding the next. |
| Sewing gives durability | Hand stitching with a matched thread closes holes structurally and blends better on textured fabrics. |
| Fabric type decides method | Delicate materials like velvet or silk often require professional repair rather than DIY fixes. |
Sofa burn repair methods explained: start with prep
No repair method works well on a dirty or unstabilized burn site. The prep stage is where most DIY attempts quietly fail, and skipping it turns a fixable problem into a visible mess.
Start by assessing the damage honestly. Is this a surface scorch that only darkened the fibers, or does it go through the fabric entirely? A surface scorch can sometimes be handled with light cleaning and color touch-up alone. A hole requires one of the three structural methods covered below.
Next, check the fabric care label. Most sofas carry a cleaning code: W means water-based cleaners are safe, S means solvent only, WS allows both, and X means vacuum only. Knowing this tells you which cleaning products won’t make the burn site worse before you even start repairing it.
Here’s how to prepare the area properly:
- Gently vacuum loose ash and debris from the burn site using a low-suction setting
- Dab the area with the appropriate cleaner for your fabric code. Avoid scrubbing, which spreads fiber damage and pushes debris deeper into the weave
- Allow the area to dry completely before touching it again
- Trim frayed edges carefully with small scissors, cutting close to the damage without removing good surrounding fabric
- Smooth the edges flat so your patch, filler, or thread has a clean, stable surface to adhere to
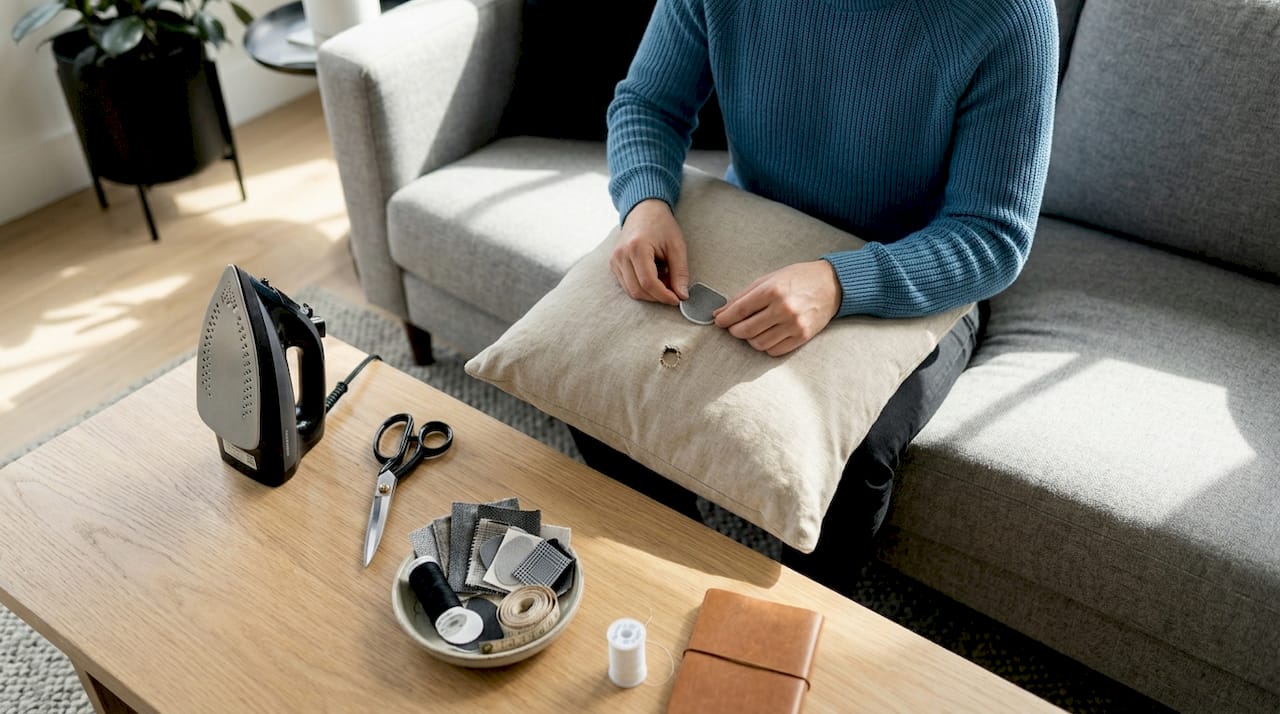
Pro Tip: If the burn is on a removable cushion cover, take it off and work on a flat surface. You’ll get cleaner cuts, better adhesion, and far more control over placement.
The iron-on patch method for burn holes
Patching is the quickest fix for holes caused by burns, and when done correctly, it looks far better than most people expect. The key variable is how well your patch fabric matches the original.
Finding matching fabric is easier than it sounds. Check under the sofa cushions or along the bottom dust cover. These hidden areas often use the same material and give you an exact match. If that’s not an option, fabric stores carry upholstery-weight materials in hundreds of textures and colors.
Follow these steps for a clean iron-on patch repair:
- Cut your patch fabric into a shape that extends at least half an inch beyond the burn hole on every side. Rounded corners hold better than sharp ones.
- Apply heat-activated adhesive tape or fabric glue to the underside of the patch, following the product instructions for your fabric type.
- Slide the patch beneath the burned area if possible, or position it directly on top for surface burns. The goal is to cover the hole completely with no visible gap around the edges.
- Press a hot iron over the patch for the time specified on your adhesive product. Use a pressing cloth between the iron and the fabric to avoid scorching the surrounding upholstery.
- Allow the bond to cool fully before touching the area. Pulling at it while warm breaks the adhesion.
- Once cooled, press the edges down firmly with your fingers and check for any lifting corners.
The main limitation of this approach is visibility. On heavily textured or patterned fabrics, even a perfect fabric match can show a seam line. It works best on flat-weave or microfiber sofas where edges blend more easily.
Pro Tip: Cut a small test piece of your patch fabric and press it against the sofa in natural light before committing to the full repair. Colors shift under different lighting, and five minutes of testing saves you from a patch that looks great indoors but wrong in daylight.
Applying liquid filler for a smooth, blended finish
Liquid filler repair, often called upholstery compound repair in the trade, is the method professional technicians use most often on leather, vinyl, and smooth synthetic fabrics. It fills the void left by a burn and, when done patiently, creates a surface you can barely distinguish from the original.
Repair kits typically include filler compound, color pigments, applicators, grain-texture sheets, sandpaper, and a finishing spray. Getting a kit designed for your specific material matters a lot. Leather kits use flexible compounds that move with the material. Vinyl kits use harder compounds that cure with more rigidity. Using the wrong one leads to cracking within weeks.
Here’s the full process:
- Cut a small piece of fabric or cardstock slightly larger than the burn hole. Slide it beneath the hole as a backing patch. This gives the filler something to rest on and prevents it from sinking or sagging as it dries.
- Mix your filler compound with the included pigments until you reach a color that matches your sofa as closely as possible. Test the mixed color on a hidden area and allow it to dry before committing, since most fillers dry slightly lighter or darker than they appear wet.
- Apply your first thin layer of filler using the included spatula or a flat palette knife. Multiple thin layers always outperform a single thick application. Thick layers trap air, develop lumps, and crack as they cure.
- Allow each layer to dry completely before adding the next. Most fillers take 15 to 30 minutes per layer depending on humidity and temperature.
- Once you have built the fill level flush with the surrounding surface, lightly sand any raised spots with fine-grit sandpaper using very gentle circular strokes.
- While the final layer is still slightly tacky, press the grain-texture sheet included in your kit firmly over the repair. This recreates the texture of the surrounding fabric and is the step that makes the difference between an obvious patch and a seamless one.
Pro Tip: Mix slightly more pigment than you think you need at the start. Running out mid-repair and trying to re-mix an identical color is one of the most common frustrations with DIY filler work.
Here’s a quick reference for filler performance by surface type:
| Fabric or material | Filler suitability | Notes |
|---|---|---|
| Leather | Excellent | Use flexible compound; matches color well |
| Vinyl | Excellent | Hard compound; durable finish |
| Smooth synthetic fabric | Good | Requires texture sheet for best results |
| Microfiber | Moderate | Filler shows texture difference more easily |
| Woven fabric or canvas | Poor | Patching or sewing works better |
Hand sewing to close burn holes on fabric sofas
Sewing is the right choice when you’re working with woven, textured, or thick upholstery fabrics where a patch would be noticeable and filler would look wrong. It takes more time and patience than the other methods, but the result is structurally sound and integrates with the fabric rather than sitting on top of it.
Here’s what you need to get right before you start:
- Choose a thread that matches your sofa fabric as closely as possible in both color and weight. Hold spools against the fabric in natural light to compare.
- Select a needle suited to the fabric thickness. Heavy upholstery canvas needs a thick, sturdy needle. Lighter fabrics need a finer one to avoid leaving visible holes.
- Trim the burn edges cleanly one more time right before you sew. Even small frays catch the thread and cause bunching.
- If the hole is larger than a dime, consider inserting a backing piece of fabric behind it before sewing, just like the filler method. This gives your stitches something to anchor to and prevents the edges from pulling inward as you work.
The whip stitch is the most practical stitch for closing burn holes. It wraps thread over and around the raw edge repeatedly, securing the fabric and preventing further fraying in the same motion. Weaving the thread across raw edges as you work locks the fibers in place better than looping alone.
Keep your stitches small and consistent. Uneven spacing is what makes hand repairs visible from a distance.
Pro Tip: When you finish sewing, run the thread back through the last six or seven stitches before cutting it. This locks the end without a knot and keeps the repair lying flat instead of bunching at the tail.
Choosing the right method for your fabric and damage
Not every method works on every material, and choosing the wrong one wastes time and can damage the fabric further. Here’s how to match your approach to what you’re actually working with.

Cotton and microfiber sofas respond well to patching and sewing. Both materials accept adhesive reasonably well and handle thread without tearing. For larger holes in microfiber, patching is typically faster. For smaller holes with tight weave, sewing blends more naturally.
Leather and vinyl are the best candidates for liquid filler. These surfaces don’t accept stitching well, and fabric patches don’t bond cleanly to them without visible edges. A fabric-specific repair kit designed for leather or vinyl gives you the right compound flexibility and color-matching tools.
Velvet and silk are the outliers. These materials are sensitive to heat, pressure, and adhesives, and a repair attempt that goes slightly wrong can damage a much larger area than the original burn. Professional repair is strongly advised for these fabrics. The investment is worth it when you consider the cost of replacing a quality velvet sofa versus a targeted professional fix. You can also read more about repair value for homeowners to help make that call confidently.
| Method | Best fabrics | Damage size | Skill level |
|---|---|---|---|
| Iron-on patch | Cotton, microfiber, canvas | Small to medium holes | Beginner |
| Liquid filler | Leather, vinyl, smooth synthetics | Small holes and surface damage | Intermediate |
| Hand sewing | Woven fabrics, textured upholstery | Small holes | Intermediate |
| Professional repair | Velvet, silk, antique fabrics | Any size | N/A |
My honest take on DIY sofa burn repairs
I’ve watched a lot of repair attempts go wrong at the very beginning, not because the person chose the wrong method, but because they rushed the prep stage. The burn looks bad and you want it gone immediately. That urgency is exactly what leads people to slap a patch over unclean, frayed, unstabilized fabric and wonder why it peels off in a week.
What I’ve found is that the prep stage is where the actual repair happens. The patching, filling, or sewing just finishes it. If you spend fifteen minutes cleaning and trimming carefully, the rest falls into place. If you skip it, no product in the world covers for that.
The other thing I’ve learned is that color matching takes longer than people budget for. Most first-timers mix their filler pigment once, apply it, and declare it close enough. Then it dries a different shade entirely. Always test on a hidden area first and let it cure fully before using it on the visible repair site.
When should you call a professional? When the burn is larger than a silver dollar, when the fabric is delicate, or when the sofa holds real sentimental or financial value. There’s no shame in that call. A good upholstery professional can handle repairs that look genuinely invisible, and for a quality piece, professional upholstery services are often a fraction of replacement cost.
— Dustin
Ready to take the next step with your repair?
If this guide helped you understand your options, Weloveupholstery has more resources to help you finish the job with confidence.

For readers tackling multiple types of upholstery damage, the upholstery seam repair guide on Weloveupholstery walks you through fixing structural seam failures with the same level of detail you found here. If you want to stock up before starting your repair, the DIY supply materials guide breaks down exactly what to buy and why. And if your sofa falls into the “call a professional” category, the Weloveupholstery repair services page is the right place to start.
FAQ
What are the main methods for repairing a sofa burn?
The three main sofa burn repair techniques are iron-on patching, liquid filler application, and hand sewing. The right choice depends on your fabric type and how large the burn hole is.
Can I fix a sofa burn hole without replacing the cushion?
Yes. Most burn holes can be repaired at home using patching, filler, or stitching, provided the fabric is not too delicate and the damage is not excessively large.
How do I stop fraying around a sofa burn before I repair it?
Trim the frayed edges cleanly with small scissors and apply a thin line of fray-stop liquid around the cut edges. This stabilizes the fabric and gives your chosen repair method a clean surface to bond to.
When should I use liquid filler instead of a patch?
Use liquid filler on leather, vinyl, or smooth synthetic sofas where patches don’t bond cleanly. It’s also the better choice when you want a flat, texture-matched finish rather than a visible layered repair.
Is professional repair worth it for a burned sofa?
For delicate materials like velvet or silk, or for damage larger than a silver dollar, professional repair is generally worth the cost. DIY methods risk worsening the damage on sensitive fabrics.