You sat down, noticed it, and your stomach dropped. A scratch on your leather sofa, whether from your cat’s claws, daily wear, or a zipper dragged across the arm, doesn’t have to stay there. Learning how to repair sofa leather scratch damage is more achievable than most people think, and the results can be impressive when you follow the right steps. This guide walks you through identifying your scratch type, gathering the right materials, and applying a repair that holds up over time.
Table of Contents
- Key Takeaways
- How to repair sofa leather scratches: know your damage first
- Gathering tools and preparing your sofa
- Step-by-step repair process
- Troubleshooting and when to call a pro
- My take on leather scratch repair
- Ready to restore your sofa with the right support
- FAQ
Key Takeaways
| Point | Details |
|---|---|
| Match repair to damage | Each scratch type needs a specific approach, such as filler, recoloring, or patching, for lasting results. |
| Cleaning is non-negotiable | Oils and contamination cause up to 70% of repair failures, so always degrease before applying anything. |
| Use flexible filler | Rigid compounds crack on upholstery because sofas flex constantly. Use a flexible leather filler only. |
| Layer thin coats | Apply filler and color in multiple thin layers, allowing full curing between each, not in one thick pass. |
| Seal to protect | Skipping the topcoat dramatically reduces how long your repair survives daily use. |
How to repair sofa leather scratches: know your damage first
Before you open a single kit, you need to understand what you’re actually dealing with. Not every mark on leather is the same, and matching repair method to damage type is the single most important factor in getting a lasting fix.
Here’s how the main damage categories break down:
- Surface scratches: These are the most common. The leather’s top coat is scuffed but the hide underneath is intact. Cat scratches often fall here. Rubbing with a conditioner sometimes reduces their appearance, but a light application of color dye or leather filler gets cleaner results.
- Deep scratches and gouges: These penetrate the leather hide itself. You’ll see a white or fibrous layer below the colored surface. These require filler to rebuild the material before any color work.
- Cuts and tears: Sharp edges or weight stress can slice through leather entirely. If the edges of the cut are separated, backing fabric plus filler is needed before recoloring.
- Peeling and cracking: This typically happens on bonded leather or older genuine leather that has dried out. The finish separates from the base. Recoloring kits with a prep solution work here, though bonded leather often needs more extensive restoration.
- Discoloration: Transferred dye from clothing, especially denim, stains the surface without physically damaging it. Degreasing and recoloring with matched dye resolves most cases.
| Damage type | Repair approach | Main risk |
|---|---|---|
| Surface scratch | Conditioner, light dye | Color mismatch |
| Deep scratch or gouge | Flexible filler, then recolor | Filler cracking if wrong product used |
| Cut or tear | Backing patch, filler, recolor | Poor structural bond |
| Peeling or cracking | Prep solution, recolor | Incomplete adhesion |
| Discoloration | Degrease, recolor | Uneven pigment absorption |
Getting this identification step right saves you time and money. A recoloring kit alone won’t fix a deep gouge. A filler alone won’t fix a tear with no backing. Take five minutes to assess the damage carefully before anything else.
 leather repair step-by-step process”>
Gathering tools and preparing your sofa
Once you know your damage type, gathering the right materials is straightforward. The essential tools for leather repair include:
- Leather cleaner or isopropyl alcohol (for degreasing)
- Leather conditioner (applied after repair, not before)
- Flexible leather filler
- Fine sandpaper in 400 to 1200 grit range
- Leather color dye matched to your sofa
- A topcoat sealant
- Palette knife or spatula for applying filler
- Small foam sponges or airbrush for color application
- Clean lint-free cloths
The preparation stage is where most DIY repairs fail before they even start. Contamination from oils or conditioners causes up to 70% of repair failures. Clean the damaged area thoroughly with a leather degreaser or rubbing alcohol on a cloth. Wipe in one direction, let it fully dry, and repeat. Do not apply conditioner yet; it will prevent the filler and dye from bonding correctly.
You’ll also want to check the flexibility of the leather around the repair area. Press it with your fingers. If it bends freely, you’re working with a flexible surface that needs a product designed for it. For upholstery supply materials and a broader look at what tools work for different repair jobs, that resource is worth bookmarking.
Pro Tip: Set up your workspace in natural daylight whenever possible. Color matching under artificial light leads to visible mismatches once the sofa is back in its normal spot.
Work in a room-temperature environment. Cold or humid conditions affect how filler cures and how well dye sets. Lay down a cloth or plastic sheet around the repair area to protect the rest of the sofa.
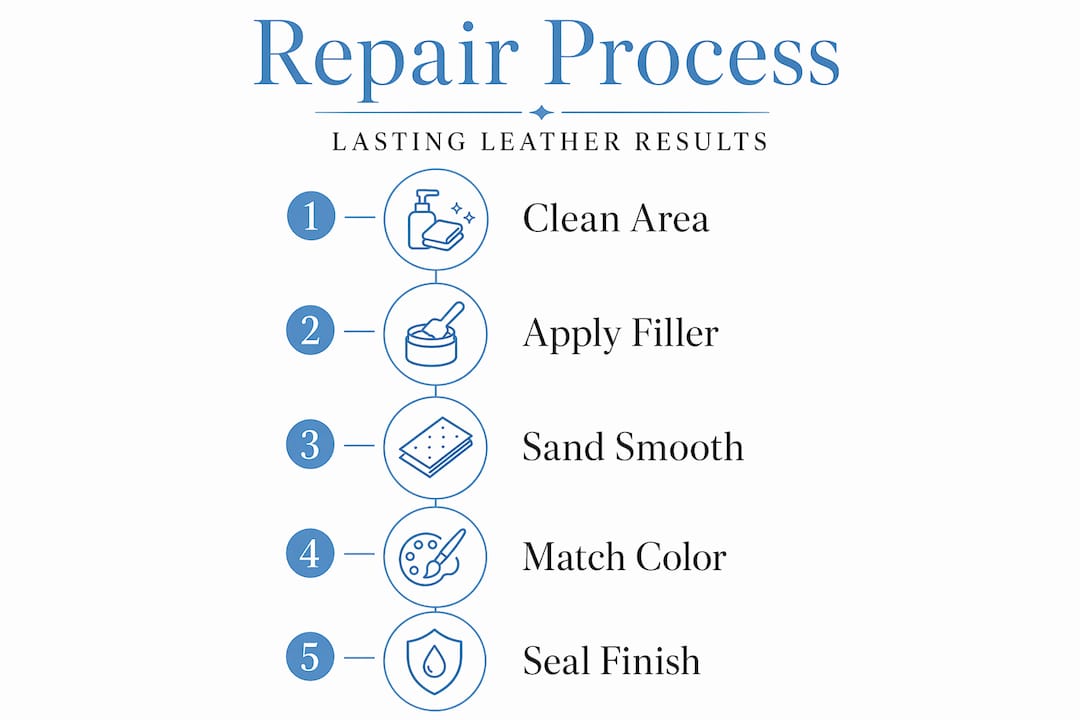
Step-by-step repair process
With your tools ready and the surface clean, here’s how to work through the repair from start to finish.
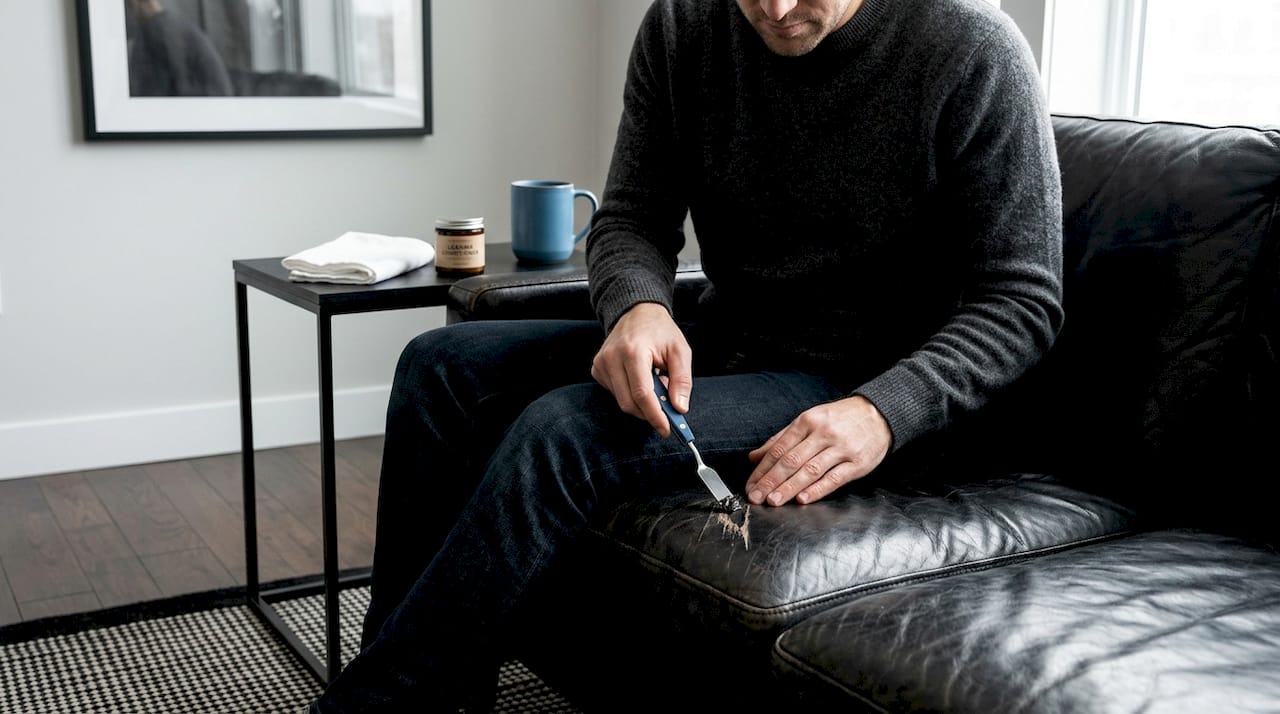
1. Trim and prepare the damaged edges.
If there are loose leather fibers or frayed edges around the scratch or tear, trim them carefully with small scissors. Frayed edges will show through the filler. For cuts and tears, slide a piece of subpatch fabric beneath the leather so it extends at least half an inch beyond the edges on all sides. Backing fabric under tears provides structural support and dramatically improves durability. Apply leather adhesive under the edges to hold the backing in place and let it cure fully.
2. Apply the first coat of flexible filler.
Use a spatula or palette knife to press a thin layer of flexible filler into the scratch or damaged area. The key word is thin. Multiple thin coats with sanding between layers produce a far better result than one thick application. A thick coat traps air, shrinks unevenly as it dries, and cracks under flex. Spread the filler smooth, feathering it slightly beyond the edge of the damage.
3. Let it cure fully before sanding.
Allow at least 6 hours or overnight curing before you touch the filler with sandpaper. Rushing this step is the most common mistake. When the filler is fully cured, use 400 grit sandpaper and sand gently in circular motions to level the surface. Wipe away dust with a clean cloth.
4. Repeat as needed.
Most repairs need two to four coats of filler to build the surface level with the surrounding leather. Each coat should be thin and fully cured before the next. After the final coat, progress through finer grits, finishing with 1200 grit for a smooth base that will hold color evenly.
Pro Tip: Hold a flashlight at a low angle across the repair area after each sanding pass. This raking light technique reveals low spots or ridges that look invisible under normal lighting.
5. Match and apply color.
This stage requires patience. Color matching is best done with custom mixes tested on a hidden area under different light conditions before you commit to the repair site. Leather changes shade as it ages, so the color in the original kit may need adjusting. Apply your color in thin coats using a sponge or airbrush, letting each coat dry before the next. Build the color gradually until it blends with the surrounding leather.
6. Seal the repair.
Once the color is dry and matched, apply a leather topcoat sealant. Skipping this step severely reduces repair longevity. Use two to three thin coats, letting each dry between applications. A matte or satin topcoat tends to look more natural on sofas than a high gloss finish.
Troubleshooting and when to call a pro
Even careful work runs into problems. Here are the most common issues and how to handle them.
- Poor color match after drying: Leather color often looks different once fully cured and sealed. Remix the dye with a small amount of the original color and apply an additional thin coat to blend.
- Filler cracking: This almost always means a rigid filler was used instead of a flexible one. Flexible fillers accommodate sofa flex while rigid compounds crack quickly on upholstery. Strip the failed filler and start again with the correct product.
- Repair area growing or edges lifting: This points to insufficient cleaning before application. The filler didn’t bond well. Clean the area thoroughly with degreaser, sand back the failed repair, and re-apply.
- Bubbling or uneven texture: Usually caused by applying filler or dye too thickly. Sand back and rebuild with thinner layers.
DIY repairs work best for minor to moderate cosmetic scratches. Structural damage such as seam failure, large tears along stress points, or widespread peeling across entire panels typically needs a professional. If you’re unsure whether a repair is within DIY scope, reviewing when professional repair is worth it can help you make a clear-headed decision before spending money on supplies.
“Seam failures and large structural tears are the clearest signals that a sofa needs a trained upholsterer, not a DIY kit.”
After your repair is done, protect it. Condition the leather every three to six months with a quality conditioner. If you’re dealing with fix couch scratches cat damage on an ongoing basis, consider placing a throw over high-traffic areas or trimming your cat’s nails regularly. Preventive care after a repair extends its life considerably.
My take on leather scratch repair
I’ve watched a lot of people skip straight to the color step because that’s the visible part. They want to cover the scratch and be done with it. What I’ve learned after working through dozens of leather repairs is that the visible part is actually the easiest step. The real work happens before you ever open the dye bottle.
In my experience, the two things that separate a repair that lasts two years from one that lasts two months are proper degreasing and flexible filler. Skipping or rushing either of those turns a $30 kit into wasted money and a sofa that looks worse than before. I’ve seen repairs done with rigid wood filler that cracked within a week because the sofa flexed during normal sitting. No amount of color work covers that.
The other thing I want to stress is patience with curing time. I know it feels like nothing is happening when filler is sitting there drying, but that overnight wait is genuinely doing the work. Layers that cure fully bond to the leather. Layers that don’t, peel.
If you go slowly, clean thoroughly, and use the right flexible products, the results on surface and moderate scratches are genuinely impressive. You don’t need professional equipment. You need the right process.
— Dustin
Ready to restore your sofa with the right support
Sometimes a scratch repair goes smoothly. Sometimes you open the sofa up and find the damage is bigger or more complex than it looked. Either way, Weloveupholstery is here to help you move forward with confidence.

Whether you’re after detailed guidance on upholstery repair supplies or you’ve decided the job calls for professional hands, our repair and restoration offerings are built specifically for situations like yours. We cover everything from product recommendations to full sofa restoration, so you’re never left guessing what comes next. Explore what’s available and find the right level of help for your sofa’s specific needs.
FAQ
What is the best way to fix leather sofa scratches at home?
Clean the area with a degreaser first, then apply flexible leather filler in thin coats, allowing full curing between layers. Finish with matched color dye and a topcoat sealant for lasting results.
Can cat scratches on a leather couch be repaired?
Yes. Most cat scratches are surface-level and respond well to a leather filler and recoloring kit. Deeper claw gouges need multiple filler coats and careful color matching before sealing.
How do I match the color when repairing a leather sofa?
Mix your dye carefully and test it on a hidden area under different light conditions before applying it to the repair site. Leather changes color with age, so custom mixing usually gives the best match.
When should I call a professional instead of doing it myself?
Seam failures, large tears, or damage covering an entire panel typically exceed DIY repair scope. A professional upholsterer has the tools and materials to handle structural damage that filler alone can’t fix.
How long does a leather sofa scratch repair last?
A repair done with flexible filler, proper layering, and a sealant topcoat can last several years with normal use. Conditioning the leather every few months and minimizing direct contact from pets or sharp objects extends the repair further.