Repairing a sofa wooden frame restores structural integrity and extends your furniture’s lifespan by years, often at a fraction of replacement cost. The industry term for this process is frame restoration, and it covers everything from sistering cracked rails to re-gluing loose corner blocks and replacing worn support webbing. You need wood glue, clamps, 2×4 lumber, hardened steel screws, and a basic understanding of how sofa frames are built before you start. This guide walks you through every stage of the repair, from diagnosing the damage to re-tensioning the base webbing, so you can fix your wooden sofa with confidence.
How to repair a sofa wooden frame: assessing the damage first
Before you touch a single tool, you need to know exactly what you are dealing with. Sofa sagging is frequently misdiagnosed, and many homeowners replace cushions or springs when the real problem is a cracked rail or a loose corner block. Testing the frame directly is the only way to separate a cushion issue from a structural failure.
Start by removing all cushions and flipping the sofa onto its back or side so you can see the underside clearly. Run your hands along every rail, looking and feeling for cracks, splits, and soft spots. Then perform a simple wobble test: grip the frame at opposite corners and rock it diagonally. Any movement beyond a slight flex signals a loose joint or broken rail.
Here is what to check systematically:
- Rails and cross members: Look for visible cracks, splits along the grain, or sections that flex under hand pressure.
- Corner blocks: These triangular wood pieces sit inside the frame corners. Press each one firmly. A loose block will shift or creak.
- Support legs: Grip each leg and twist. Wobble means a stripped T-nut or a cracked mounting block.
- Webbing and springs: Sagging webbing or a broken sinuous spring causes seat collapse but is not a frame failure. Persistent creaks or wobbling indicate structural issues that go deeper than springs or cushions.
- Joints and fasteners: Check every glued joint for separation and every screw for stripping.
Pro Tip: Lay a flashlight flat against the frame surface and shine it along the wood grain. Cracks that are invisible in normal light cast sharp shadows under raking light, making them easy to spot.
If the frame shows multiple broken rails, severely rotted wood, or widespread joint failure, review the repair vs. replacement decision before committing to a full restoration. Most single-rail breaks and loose joints are well within DIY range.
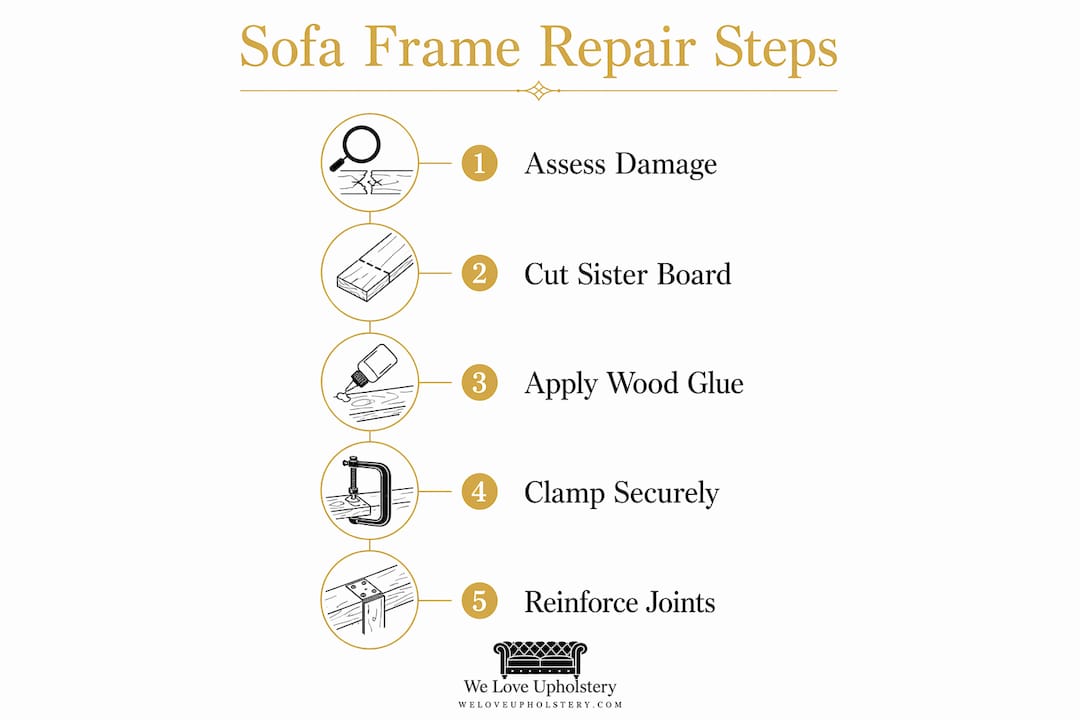
Step-by-step guide to fixing broken or cracked sofa rails
A cracked or broken rail is the most common frame failure, and the correct fix is sistering. Sistering means attaching a new board alongside the damaged one to carry the load. Reinforcing with a sister board is a cost-effective repair that often surpasses the original factory durability when done correctly.
Follow these steps in order:
-
Select your sister board. Use a piece of 2×4 lumber that matches the thickness of the original rail as closely as possible. The board must extend at least 12 inches past the crack on both sides to redistribute the load effectively. Cut it to length with a miter saw or circular saw.
-
Dry fit before gluing. Hold the sister board against the damaged rail and check for gaps or bowing. If the original rail is bowed, clamp it straight before proceeding. A bowed rail glued in place will transfer stress unevenly and fail again.
-
Apply wood glue. Spread a thin, even coat of high-strength wood glue, such as Titebond III or Gorilla Wood Glue, across the full contact surface of the sister board. Do not glob it on. A thin, complete coat bonds better than a thick, uneven one.
-
Clamp firmly and cure. Press the sister board against the rail and apply clamps every 6 to 8 inches along the length. Wood glue requires at least 24 hours under clamp pressure to reach full structural strength. Do not sit on the sofa before this curing period is complete.
-
Drive your screws. Once the glue has cured, add hardened steel wood screws for mechanical reinforcement. Screws resist pull-out forces far better than nails in a flexing furniture frame. Space them every 4 to 6 inches and stagger them slightly off-center to avoid splitting the wood along the grain.
-
Check alignment. Before reassembling the sofa, press the repaired rail firmly and confirm there is no flex or movement at the crack point.
| Step | Tool or material | Key detail |
|---|---|---|
| Cut sister board | Miter saw or circular saw | Minimum 12 inches past crack on each side |
| Glue application | Titebond III or Gorilla Wood Glue | Thin, even coat across full surface |
| Clamping | Bar clamps or pipe clamps | Every 6 to 8 inches, 24-hour cure |
| Fastening | Hardened steel wood screws | Staggered, every 4 to 6 inches |
Pro Tip: Never use nails to fasten a sister board. Nails allow micro-movement under load, which breaks the glue bond over time. Screws lock the joint permanently.
How to repair and reinforce sofa frame joints and support legs
Loose joints and failing support legs are the second most common frame problem, and they are often what causes a sofa to rock or creak under normal use. The repair approach differs depending on whether the wood itself is damaged or just the hardware.
For loose corner blocks, the fix is straightforward. Scrape out any old, dried glue from the joint surfaces using a chisel or utility knife. Work fresh wood glue into the joint, press the block firmly back into position, and clamp it for at least 24 hours. Once cured, add two or three screws through the block into the rail for added security.
For support legs, the problem is usually a stripped T-nut rather than a broken leg. Here is how to address it:
- Stripped T-nut: Drill out the damaged hole slightly larger, cut a hardwood or plywood block to fill the void, glue and clamp it in place, then install a larger T-nut or steel mounting plate once the glue cures.
- Cracked mounting block: Remove the old block entirely, clean the surface, and glue a new hardwood block in its place before re-drilling for the leg hardware.
- New center support leg: When installing a replacement adjustable leg, set it about 1/8 inch shorter than the corner legs. This accounts for frame and cushion compression during use and prevents the sofa from rocking when someone sits down. Slide a piece of paper under the center leg to confirm the gap is correct.
After all joints and legs are repaired, set the sofa on a flat floor and press down on each corner. The frame should sit completely still with no rocking. If one corner lifts, the leg height needs adjustment before you reassemble.
Pro Tip: Test frame squareness by measuring diagonally from corner to corner in both directions. If the two measurements match, the frame is square. If they differ by more than 1/4 inch, clamp the frame diagonally to pull it into square before the glue sets.
How do you repair and restore sofa base webbing?
Webbing is the grid of straps stretched across the sofa base frame that supports the springs or cushions directly. Two main types exist: jute webbing, which is a firm natural fiber used in traditional frames, and elastic webbing, which is a modern rubber-based strap used in contemporary designs. Jute provides firmer support and is better suited to heavier loads, while elastic webbing offers more give and is easier to install.
Before re-webbing, inspect the frame rails for strength. Applying tension to a weakened rail accelerates damage and can split the wood within weeks. Repair any cracked or loose rails first, as described in the previous sections.
Follow this sequence to replace the webbing correctly:
- Remove old webbing. Pull out all staples or tacks using a tack puller or flathead screwdriver. Clear the rail surface completely.
- Measure and cut new webbing. Cut each strip about 2 inches longer than the span to allow for the fold-over attachment.
- Fold and staple the first end. Fold the webbing back on itself by about 1 inch and drive two staples through both layers into the rail. Staples grip better than tacks and reduce the risk of the webbing pulling through under tension.
- Stretch and tension. Pull the webbing across to the opposite rail using a mechanical webbing stretcher. A webbing stretcher provides precise tension that hand-pulling cannot match. Aim for a 10 to 15 percent stretch, confirmed by a firm, drum-like sound when you tap the strap.
- Fold and staple the second end. Fold and double-staple the far end before cutting off the excess.
- Weave the cross straps. Run the perpendicular straps in a basket-weave pattern, alternating over and under each lengthwise strap. This interlocking pattern distributes weight evenly and prevents individual straps from shifting.
| Webbing type | Material | Best use | Stretch target |
|---|---|---|---|
| Jute webbing | Natural fiber | Traditional frames, heavy loads | Minimal, firm tension |
| Elastic webbing | Rubber-based strap | Modern frames, lighter loads | 10 to 15 percent |
One critical warning: over-tightening webbing on softwood frames can warp or break frame joints. If your sofa uses pine or another soft wood, reduce tension slightly and check the rails for any sign of bowing after installation.
Key takeaways
Repairing a sofa wooden frame requires accurate damage diagnosis, proper sistering technique with quality materials, and correctly tensioned webbing to restore lasting structural strength.
| Point | Details |
|---|---|
| Diagnose before you repair | Test the frame directly with a wobble test to separate cushion wear from structural failure. |
| Sister boards restore rail strength | Cut a 2×4 at least 12 inches past the crack, glue, clamp for 24 hours, then secure with steel screws. |
| Glue curing time is non-negotiable | Wood glue needs a full 24 hours under clamp pressure before the joint can bear any load. |
| Center leg height matters | Set the center support leg 1/8 inch shorter than corner legs to prevent rocking under load. |
| Webbing tension must be balanced | Stretch webbing to 10 to 15 percent and use a mechanical stretcher for even, durable support. |
What I have learned from years of sofa frame repairs
Most DIY frame repairs fail not because the technique is wrong, but because the diagnosis was rushed. I have seen homeowners spend hours sistering a rail that was structurally sound, while the actual problem was a single loose corner block that took ten minutes to fix. The wobble test and the raking-light crack inspection are not optional steps you can skip to save time. They are the repair.
The second mistake I see constantly is treating glue curing time as a suggestion. Titebond III and similar wood glues feel dry to the touch in two hours, but they reach full strength only after 24 hours under pressure. Sitting on a freshly glued joint before it cures is how you undo an hour of careful work in thirty seconds.
My honest opinion on materials: do not buy the cheapest wood glue at the hardware store. The difference in price between a budget glue and Titebond III is about three dollars. The difference in joint strength is significant. The same logic applies to screws. Hardened steel screws cost a little more than drywall screws, but drywall screws snap under the lateral stress a sofa frame generates. Use the right fastener.
On webbing, the basket-weave pattern is not decorative. It mechanically locks each strap in place so that no single strip can shift or pull free independently. Skip the weave and you will be re-doing the job within a year. And always repair the frame rails before you re-web. Tensioning new webbing against a cracked rail is the fastest way to split that rail completely.
Finally, know when to stop. If the frame shows widespread rot, multiple broken rails, or wood that crumbles under hand pressure, the repair cost in time and materials will exceed what a quality used sofa costs. Weloveupholstery has a clear guide on when repair stops making sense that is worth reading before you commit to a major restoration.
— Dustin
Ready to finish your sofa frame restoration?
Once your frame is solid, the next step is getting the upholstery back in place with the right materials and technique. Weloveupholstery has everything you need to take your repair from bare frame to finished furniture.

From selecting the correct webbing and wood glue to choosing a fabric that holds up to daily use, the DIY upholstery supply guide at Weloveupholstery covers every material decision in plain language. If your repair also exposed a torn or separating fabric seam, the step-by-step guide on fixing upholstery seams walks you through a lasting fix. Weloveupholstery guides are written by practitioners who have done these repairs, not by content teams working from theory.
FAQ
Can you repair a wooden sofa frame yourself?
Yes. Most common frame problems, including cracked rails, loose corner blocks, and stripped T-nuts, are within DIY range with basic tools like clamps, wood glue, and a drill. Widespread rot or multiple simultaneous failures may require professional help.
How long does wood glue take to cure on a sofa frame?
Wood glue requires a minimum of 24 hours under clamp pressure to reach full structural strength. Avoid sitting on the sofa or applying any load to the repaired joint before that curing period is complete.
What lumber should I use to sister a broken sofa rail?
Use 2×4 lumber that matches the original rail thickness as closely as possible. The sister board must extend at least 12 inches past the crack on both sides to distribute the load effectively across the repair.
How tight should sofa base webbing be?
Webbing should be stretched to 10 to 15 percent of its resting length, producing a firm, drum-like sound when tapped. Over-tightening on softwood frames risks warping or splitting the rails.
When should I replace a sofa instead of repairing the frame?
Replace the sofa when the frame shows widespread rot, multiple broken rails, or wood that has lost structural density. A single cracked rail or loose joint almost always justifies repair over replacement.